Online Courses that Sell
This Thrive Apprentice review will examine whether it’s excellent and worth your money. We constantly update our reviews, so you’ve come to the right place.
I’ll show you exactly how we created our first professional online course using only Thrive Apprentice, the latest offering in the Thrive Suite’s set of tools.
If you have a WordPress site or blog like this one, Thrive Suite (which we use) is a must-have for anyone looking to set up and run a successful online business at a minimal cost.
We’ll review Thrive Suite soon, but let’s focus on the latest addition to their toolkit, “Thrive Apprentice.”
What is Thrive Apprentice?
Thrive Apprentice allows you to create and sell your courses online straight from your WordPress website without the need for expensive web developers and graphic designers, not to mention the labor costs of these professionals.
Now you can fully control your Udemy-like site, selling courses or giving them away for free. It's all in your hands, and all sales will go straight into your pockets instead of some corporate high-up in an office somewhere.
Places like Udemy or Skillshare rake in MILLIONS of dollars by giving others a platform to sell their courses, and now you have that same power at your fingertips.
Thrive apprentice is a great course builder using an advanced learning management system.
Create professional course pages with the latest from Thrive Themes, a fantastic WordPress plugin called Thrive Apprentice. Are you ready to take your online teaching to the next level?
With Thrive Apprentice, you can easily create online courses that excite and engage your students. This fantastic WordPress plugin from Thrive Themes makes creating high-quality lesson pages, quizzes, and certificates of completion easier than ever.
You'll also have access to valuable analytics to track student progress and ensure everyone understands the material. With Thrive Apprentice, you can finally become a master teacher! So get started today and show everyone what you've got.
Thrive Apprentice Learning Management System
The Thrive Apprentice plugin is the perfect solution for instructors looking to take their courses to the next level. With Thrive Themes drag and drop builder, you can create beautiful, engaging lessons that your students will love.
In addition, Thrive Apprentice's intuitive user interface makes setting up and managing a course more straightforward. With Thrive Apprentice, you can make learning more enjoyable while increasing engagement and improving student success! So why wait? Get started with Thrive Apprentice today and watch your courses soar to new heights!
Let me show you how Thrive Apprentice works:
Setting up a New Course with Thrive Apprentice
1. Select "Add New Course" from the Thrive Apprentice dashboard.
Thrive Apprentice uses the Thrive Theme Builder architecture, so if you're familiar with Thrive Architect's drag-and-drop builder, this will all be very familiar to you.

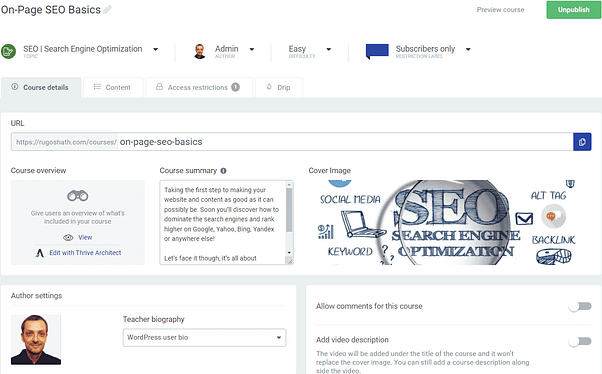
2. After you've clicked "Add New Course" you'll see the following screen:

Now you'll notice that my new course dashboard is all filled out, whereas yours will be empty, of course, but this is to show you how little it takes to get your new course up and running on your WordPress site.
In the Thrive Apprentice course builder, you'll see four tabs at the top; Course Details, Content, Access Restrictions, and Drip.
The screenshot above is the default page which is the "Course Details" page.
All that's needed here is the following:
2.1 URL is the website URL where you'd like your course to be displayed (and sold). You'll see mine has the "/courses/on-page-SEO-basics" slug. You can change the "/courses/" part in the settings, which is a different screen altogether. Then, of course, you can call it whatever you want. We'll get to the settings later.
2.2 Course Overview, which you can design to your liking using one of the many templates included in Thrive Suite using Thrive Architect, the best WordPress page builder there is by far. So you have complete control over the whole look and feel of your brand-new course.
2.3 Course Summary, self-explanatory. Just enter a summary of your course, and you're good to go.
2.4 Cover Image, again, simply the image you'd like to be displayed at the top of your course page or wherever you choose to display it in 2.3.
2.5 Author Settings, here, you can use your WordPress bio to speed things up or create a new custom bio for the author section by clicking the dropdown menu.
2.6 Lastly, you can choose whether you want to allow comments on your course and if you'd like a description for your video (if there are videos, my example doesn't have one). Tick these options on or off, and you're done with your Course Details.
3. Click on the "Content" tab at the top. You'll notice a blue arrow to the right to "Add Course Content." Click that.
I know this Thrive Apprentice review is a bit long, but I wanted to make it as thorough as possible compared to other reviews out there.
Next, you'll see this pop-up:

Depending on the size of your online course, you might not necessarily need modules or even chapters, just lessons.
I see it like this, from right to left...
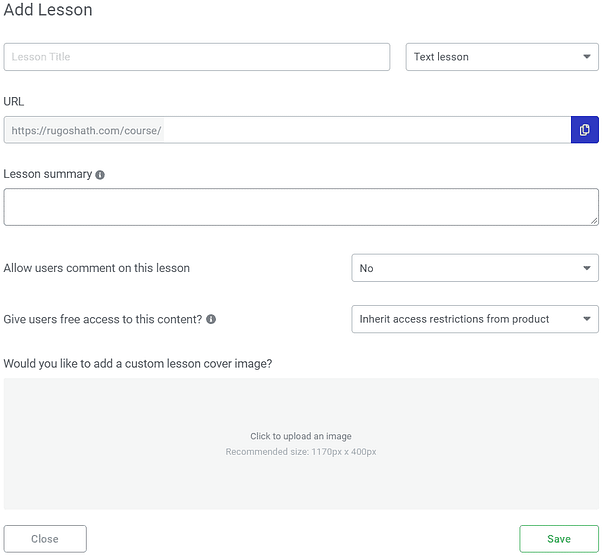
Modules contain Chapters, and Chapters include Lessons. Lessons will be sectioned into chapters and modules. For the sake of not boring you to death and going into great detail about all three options, let me show you what the "Add Lesson" screen looks like:

Everything is straightforward regarding adding new lessons, modules, and chapters with Thrive Apprentice. All three work the same.
3.1 Lesson Title, which is simply a title for the specific lesson. To the right side, using the dropdown menu, you can choose between Text Lesson, Audio Lesson, or Video Lesson.
3.2 URL is the URL, or "slug," for that specific lesson.
3.3 Lesson Summary, again, this is self-explanatory.
3.4 Allow Comments for the lesson, a simple yes/no dropdown.
3.5 Access rights dropdown lets you choose whether you'd like to give a particular lesson away for free. It's good practice to give away the first 2 or 3 lessons for free, which will act as bait for the rest of your course.
Your options here are; "Inherit access restrictions from the product,” which we'll set later; "Free for Logged-In users,” which requires that they register first (great for lead generation); or "Free for All Users,” which makes it accessible for everyone.
3.6 Custom Lesson Image. This part isn't required, but if you'd like to give your Thrive Apprentice lesson, chapter, or module a custom image, this is where you can do that.
Hit the "Save" button, and you've just added your first lesson to your online course.
4. Now for the "Access Restrictions,” we'll set who can see what, whether a course is free, paid, or requires a subscription. I love this part the most.
To read more about this, I suggest reading the official post here, which discusses the course access restriction options available to you in great detail.
5. The final tab is "Drip,” allowing you to drip-feed your course content exactly how you'd like. Whether you want to release a chapter, module, or lesson every 'X' days/weeks/months, after a specific action or "upgrade, the choice is yours.
After clicking on the Drip tab, you'll see the following screen:

Now click on "Create first Drip Campaign" to set up exactly how you want your course sections to be delivered and when.
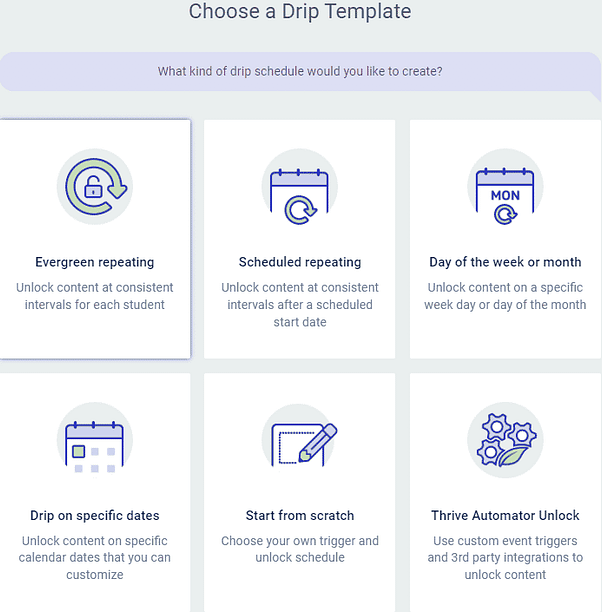
You'll now have the following options to choose from here:

5.1 Evergreen repeating unlocks content at regular intervals for each student.
5.2 Scheduled repeating unlocks course content after a start date set by you.
5.3 Day of the week or month unlocks content on a specific day or month.
5.4 Drop on specific dates unlocks course content on particular calendar dates, which is fully customizable by you.
5.5 Start from scratch lets you choose your triggers and custom drip schedule.
5.6 Thrive Automator Unlock is used for 3rd party integrations, giving you much more control over how and when your content gets delivered, which is fantastic.
Select the dip schedule you'd like for your online course, and you're done.
Go here for a much more detailed overview of these courses, drip-feed templates, and how to set things up step-by-step.
6. That's pretty much it, but before you can hit "Publish," you need to take care of these four sections right at the top:
6.1 Topic is where you can select whether you want to group your courses via topics, similar to categories for blog posts. You can add a topic and call it whatever you wish when you click here.
6.2 Author is simply the author of the course, so here you can select which of your WordPress users or subscribers made the course, and bam... You're all set.
6.3 Difficulty is where you can set how challenging a course is. You have five options by default; None, Easy, Intermediate, Advanced, or add your course difficulty.
6.4 Restriction Label is for displaying a label on the course, like "Subscribers Only" or "Premium Course.” You can also create your own labels for your courses and select custom colors for each.
You're done. Now you can hit "Publish," and your online course will go live, look fantastic and start generating leads and sales. We're almost done with this Thrive apprentice review, I promise.
You can create your email templates in the Thrive Apprentice settings, choosing how your customers' login and password details get delivered via email. Create your own or use the default template for your courses.
Conclusion
If you made it this far, I hope you enjoyed our Thrive Apprentice Review and that you seriously consider adding Thrive Suite to your WordPress arsenal.
Thrive Themes have everything you need
Not only is Thrive Apprentice the absolute best designer to create and sell your online courses, but Thrive Suite as a whole has a TON of value. The Thrive dashboard is clean and easy to use, and when it comes to WordPress page builders, Thrive Themes have set the bar very high with this great plugin.
Thanks for reading our Thrive Apprentice Review; now, create with Thrive Suite and Thrive Apprentice. You won't regret it.
Recommended reading:
